
Under the Sea or Hiking at Capitol Reef?
Plan your visit to Utah's most underrated national park: Capitol Reef National Park.
Originally published at out-spiration.com
I like to refer to Capitol Reef National Park as Utah’s most underrated national park. When you think of Utah’s Mighty 5, the first parks that come to mind are probably Zion and Arches National Park. These parks are flooded with visitors and visitor mitigation practices are being put into place to help manage the large influx of tourists. That is why I chose to visit Capitol Reef on one of my many adventures in Utah. Visitation was increasing at Arches National Park where I was working, and I wanted to take a break from people. With helpful advice from my roommate and a ton of research, here is how I spent two days on a solo camping and hiking trip to visit the overlooked beauty of Capitol Reef National Park.
About Capitol Reef National Park
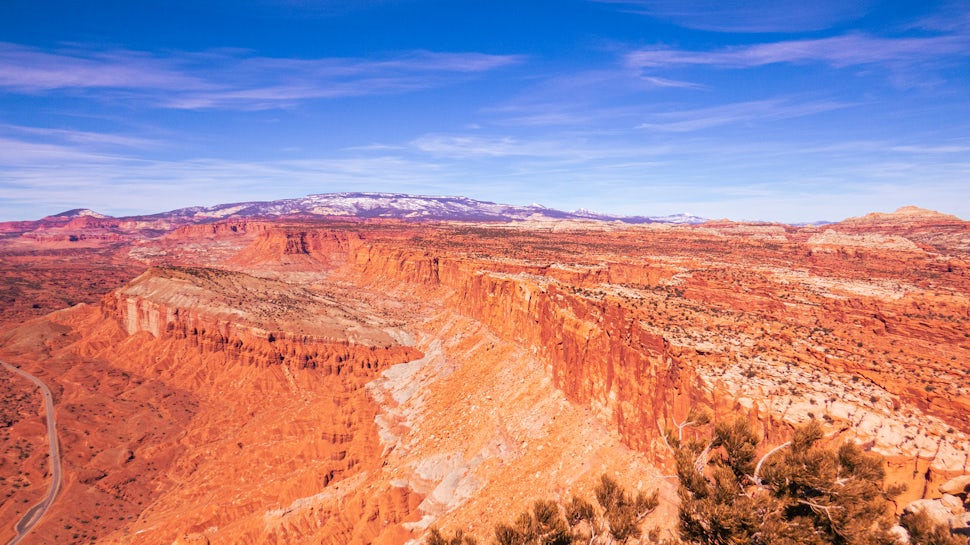
Located in Utah’s south-central desert, Capitol Reef National Park surrounds a geologic wrinkle on the Earth’s surface: the Waterpocket Fold. This hidden treasure is full of cliffs, canyons, domes, arches, and bridges along the 100-mile monocline.
Capitol Reef National Park was established in 1971 to protect 241,049 acres of red rock desert landscape. The park was named for the white domes of Navajo Sandstone that resemble the United States Capitol building.
The park is rich in ancient and Mormon culture featuring petroglyphs from the Fremont Native American culture as well as a historic Mormon settlement. Visit the NPS’s History and Culture page for more information on the history of Capitol Reef National Park.
Know Before You Go
Be sure to follow all Leave No Trace principles while out on the trail and camping. It is required to use pack out all human waste, so make sure to bring your toilet bag.
The Trip
Day 1: Hiking to Cassidy Arch and the Frying Pan
Trail Rating: Chaco
Distance: 8-miles one-way
Trail Traffic Level: High

Capitol Reef is only a two-and-a-half-hour drive from Moab, so I left mid-morning after taking care of a few obligations at home. I arrived at the park a little before noon where I swung by the Visitor Center to grab some maps and to run my hiking plan over with an expert park ranger.
My first stop of the day was Cassidy Arch. I made my way down the scenic drive until I came to a left-hand turn that leads to the Grand Wash West Trailhead. This bumpy, gravel road travels about 1.3 miles before you reach the trailhead. I enjoyed a lunch of crackers, salami, and cheese in the trunk of my car before I threw on my pack and started my hike.
Cassidy Arch Trail
The hike begins on the Grand Wash trail before the Cassidy Arch trail forks off to the left about three-quarters of a mile from the parking lot. This is where you start your 950-foot ascent.
This part of the hike was the most strenuous part of the hike because you need to follow a series of switchbacks to climb out of the canyon and up onto the colorful cliffs.
After three-quarters of a mile, I was greeted with expansive views. The rest of the hike is slightly uphill but is easy enough. To the left, there were views of Grand Wash Road below and in front of me, views of the sandstone bench and Cassidy Arch.
About 1.2 miles from the Grand Wash Trail junction the trail will split into two trails: one leading to Cassidy Arch and the other towards the Frying Pan trail. I went left as the sign indicated.
The trail gets a little bit more difficult here because you need to rely on carefully placed cairns, rock stacks that help guide the way, to navigate towards the arch since it is not in plain view. When I did this hike, I followed the people ahead of me to the edge of the slickrock bench. I looked over the side seeing instead of an arch but a straight drop down to the ground below. I quickly determined that the people I had followed had no clue where the arch was, so I retraced my steps back to the last cairn I saw. Another cairn was visible to the left, so I followed that until I saw the gaping opening of Cassidy Arch in all its glory. If you do this hike, stay to the instead of going straight ahead like I did.

Unlike the arches at Arches National Park, you can walk along the top of Cassidy Arch. I walked along the slickrock so I could walk across the arch. After relishing the feeling of standing on top of an arch, I found a place to view the arch while enjoying a snack.
I noticed the clueless hikers meandering over to where I was hoping that they would notice that I had found the arch and willing them to come take a picture for me as if my mind had supernatural capabilities. I was probably just staring like a creep. The problem with solo hiking is you either just take a photo of the landscape or you need to find a rock to capture your own presence. It was like the desert gods heard my prayers as the hikers made their way over towards me.
I asked if they would be willing to snap some photos of me, and in that instant, I knew that we were going to be friends. The girl, Stephanie, got into photographer mode right away. She commanded my every move. After my photos were taken, I returned the favor for Stephanie and her friend, Shane. We sat down together, and I discovered that Stephanie and Shane had met five days earlier at Zion National Park when Stephanie was trying to take a cool photo of Shane. They hit it off and had been traveling around Utah’s national parks together. I wasn’t quite ready to leave the companionship of these two people, so I took a chance and hiked out via the Frying Pan and Cohab Canyon to their campsite.
The Frying Pan Trail
My initial plan was to explore Grand Wash but my need for human interaction sent me up the Frying Pan Trail. This is a point-to-point trail that is either accessed from the Cassidy Arch Trail or the Cohab Canyon Trail.
We retraced our steps back to the Frying Pan and Cassidy Arch Trail Junction and went left to continue on our hike. Our group of three continued up another climb that passed through pygmy forest until we reached the high point after about one mile. This is an awesome vantage point. On clear days, you can see the La Sal Mountains east of Moab, domes of Navajo Sandstone, and Horse Mesa to the northeast.
After reaching this high point, we started the long descent into the Frying Pan, an expansive canyon made up of Kayenta Formation eroded structures. After about, a mile we reached a sandy wash crossing.
Conversation flowed easily between our group of three as we climbed the trail for another mile or so. We talked of travel, relationships, our jobs, and life in general. Trail talk leads to some of the best conversational moments, and I was basking in the connection we were making.
We descended down into Cohab Canyon where we crossed for a short-time on slickrock before we climbed out of the canyon and descended down a series of switchbacks to the campground. My new friends brought me back to my car where we exchanged contact information and said goodbye.
Camping
After a full day of hiking, I headed into the town of Torrey, UT to find a dispersed site to park my car at. I had done some previous research and talked to my roommate about some sites in between the park and Torrey at mile marker 73. I located a site I wanted to camp at and then drove up to Panorama Point to cook a dinner of TastyBites and rice and watch the sunset.

After enjoying a vibrant sunset, I drove to my campsite and snuggled into my car where I read until I couldn’t keep my eyes open any longer.
Day 2: Navajo Knobs
Trail Rating: Tennis Shoe
Distance: 9.5 miles round-trip
Trail Traffic Level: Low

I woke up in my car to 15-degree temperatures and iced over windows. Dragging myself out of the warmth of my sleeping bag, I began the process of warming up my car. Once the windows had defrosted, I drove over to the gas station to get myself a hot coffee and to tidy myself up in the bathroom before I went on my next hike.
The plan for Day 2 in Capitol Reef National Park was to hike up to Navajo Knobs. My roommate had recommended it because of the panoramic views and the heart-pumping workout it provided.
The Navajo Knobs Trail provides a unique view of the park. Instead of looking up at canyon walls and Wingate sandstone cliffs, this 9-and-a-half mile out-and-back hike takes you on a trek along the rim with two fantastic viewpoints along the way. On a clear day, you will have 360-degree views of not only the Visitor Center and the historic Fruita district which sit around 1,400 to 1,500 feet below but these views stretch as far as the Cathedral Valley District to the north, the Henry Mountains to the east, and Miners and Boulder Mountains to the south.
The hike begins at the Hickman Bridge Trailhead on Highway 24 about 2 miles easy of the Visitor Center. Most of the hikers at this trailhead are heading up to Hickman Bridge which is an easy 1.5 mile out-and-back hike. Prior to starting my hike, I parked my car at the trailhead and made myself a breakfast of oatmeal.
After I gave myself some proper nutrition, I started hiking. The first 1/10th mile follows the Fremont River before the start of a steep ascent up a series of steps and switchbacks. The trail levels out after 0.25 miles at the Rim Overlook Trail Junction where I walked along the sloping Kayenta formation shelf that remained consistent for the majority of the hike.
At the trail junction, I went to continue right towards the Rim Overlook that climbs gradually. There are two brief drainages that I crossed with towering views of the Navajo Sandstone cliffs that I couldn’t help staring up at in wonder. After crossing the second wash, the trail travels across slickrock ad pygmy forest. About 0.8 miles from the trailhead, I reached the Hickman Bridge Overlook.
For the next 1.5 miles, I crossed four sandy washes each followed by a series of 100 to 200 foot climbs up slickrock. I was determined to climb each incline without stopping, so I put my game face on and kept placing one foot after another. While the trail is well-marked, there are cairns carefully places to help guide the way. After 2.3 miles, I reached the Rim Overlook. I stopped to enjoy a snack of Peanut Butter and Jelly bites, took a few photos, and enjoyed the sweeping views of the Scenic Drive below and the Henry Mountains.

Most people turn around here but I am not most people, and I hope since you’re reading this, you are not either. The trail to Navajo Knobs continues another ¼ mile along a side canyon around biological soil crust (don’t bust the crust!) and dense brush. After this section, the trail continues its gradual climb of 150 feet. After cresting the ridge, I was greeted with views of the Visitor Center and the Castle. There is a spur trail that leads to an old radio tower. I decided to pass on this mini-adventure and continued the trail to Navajo Knobs, which were in sight.
The trail continues along a bend in the cliff that seems to go on forever. It starts with a pleasant downhill descent that crosses two washes and is also surrounded by living soil crust speckled with cyanobacteria.
When I was one mile from the Knobs, the final 600-foot ascent up slickrock began. The trail winds around another side canyon before I finished the ascent with a 30-foot scramble to the top of the knob. There are a variety of social trails and options to choose from to scramble up the knobs. Disclaimer: The top of the knobs is very exposed so exercise extreme caution.

I enjoyed 100-mile views and ate a filling lunch before I turned around for my hike back. The hike back is straightforward because you follow the same way you took; however, that pleasant downhill turned into a 300-foot ascent.
My Packing List
Here is everything I packed for a two days and one night at Capitol Reef National Park:
Sleep System. For sleeping, I brought my:
- Kelty Cosmic Down 0 Degree sleeping bag. While this sleeping bag is heavy for backpacking, this sleeping bag has kept me toasty in below freezing temperatures.
- Therm-a-Rest Neoair XTherm. With an R-Value of 6.9, this sleeping pad combined with my sleeping bag makes for a warm and comfortable night of sleeping.
- My yoga mat for extra comfort.
- A pillow
- And an extra blanket for extra warmth.
Cooking System. For cooking, I brought my:
- MSR Pocket Rocket 2 Stove
- Toaks Titanium 1100ml Pot and Pan
- Lighter
- Plate, bowl, and Toaks Titanium Spork
- Coffee cup
- Biodegradable dish soap and rag
- Enough food for one nights and two days plus some
Headlamp and extra batteries
Water….and lots of it. I brought 4.5 gallons of water because there is no place to filter water at the dispersed campsites or on the hikes in general.
Black Diamond Trail Ergo Cork Trekking Poles. I never go hiking without my poles. I highly recommend these Black Diamond poles because they are durable (they have survived sliding down a glacier) and have an ergonomic grip.
Osprey Mira AG 34 Hiking Pack. This is the perfect winter pack. I can fit extra layers, my snowshoes if I need them, and my camera, lots of water, and tons of food. You can check out my review on the pack here.
Trail Runners. The temperatures called for 50 degree weather and it hadn’t snowed in a few weeks so I thought my Hoka Speedgoat 3’s would be a good hiking option.
Wag Bag. You have to pack out human waste in the desert so go prepared with a wag bag when nature calls.
Toiletries. I like to maintain my personal hygiene when camping. I always bring a toothbrush, toothpaste, deodorant, body/face wipes, hand sanitizer, lip balm, and hair ties. I usually keep my hair braided for the entirety of my trips since it’s curly and a brush would turn it into a lion’s mane.
OTC Medications. I never leave my house without antihistamines (Benadryl and Zyrtec) or Tylenol and Ibuprofen.
Sun Protection. As a ginger, I never go hiking or camping without sunscreen and sunglasses.
Camp shoes. I hate wearing my hiking shoes after a long day of hiking so I always bring camp shoes for camping or my “after-hiking” shoes for after hiking for optimal comfort.
Extra amenities. For entertainment, I brought a book to read, my camera and tripod, and my phone charger.
We want to acknowledge and thank the past, present, and future generations of all Native Nations and Indigenous Peoples whose ancestral lands we travel, explore, and play on. Always practice Leave No Trace ethics on your adventures and follow local regulations. Please explore responsibly!
Do you love the outdoors?
Yep, us too. That's why we send you the best local adventures, stories, and expert advice, right to your inbox.


